Dogcraft Wiki

Archive/Mall Guide (Survival 4)

From Dogcraft Wiki

< Dogcraft Wiki:Archive
Revision as of 03:36, 28 July 2024 by Domino (talk | contribs) (Category:Server Information -> Category:Archive/Server Information)
(diff) โ† Older revision | Latest revision (diff) | Newer revision โ†’ (diff)

The Dogcraft Server features buying and selling plugins that allow players to create "chest-shops" or "slab-shops" that can be used to buy or sell items for the server's currency, Dogcraft Dollars. The Mall is a designated area for these exchanges to take place.

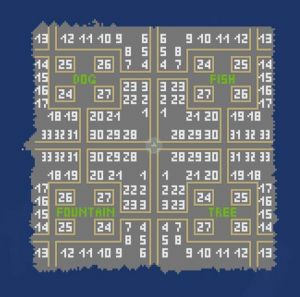
Map of the plots in the mall

This guide will help you through the Mall experience step by explaining the physical mall layout, using the shops in plots, and how to create your own shop.


Navigating the Mall

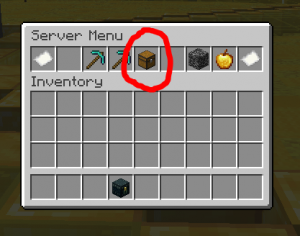
Selecting the Mall to warp to.

The Mall can be accessed in the same fashion that any world can be selected on the Dogcraft server. Namely, type the command /servers into chat. An inventory popup will appear, with several icons on the top row. Select the chest icon, which can be found beside the two pickaxes, and you will be teleported to the Mall.

You will enter the Mall in it's center. The Mall can be a daunting area to begin with, but it has several cues that can help you to navigate it.

Once you have loaded into the area, look directly down. You will find a map of the area at your feet. In addition there are information boards around the mall with maps. The map will reveal that the Mall is made up of four hubs, one in each corner of a square, and connected by paths.

A navigation pole example. This one reads that the player is on the border of the Tree and Fountain areas (Tree on the left and Fountain on the right). They are on the bottom floor.

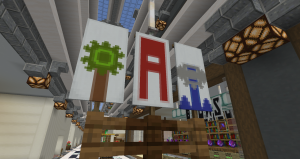
Each corner hub of the Mall has it's own name and symbol:

  • Northwest - Dog
  • Northeast - Fish
  • Southwest - Fountain
  • Southeast - Tree

These symbols are portrayed by banners and a statue of each in the center of their corner hub. Examples of banners can be seen whilst looking directly upwards from the spawn location of the mall.

Each floor of the building has it's own letter. The bottom floor is A, ranging up to the highest which is C (not opened at time of writing). Different levels can be accessed by the water spouts at the Mall spawn point or by staircases along the corridors.

Navigation poles in the center of the corridors of the Mall use a combination of both symbol and letter to indicate your location. Reading these will give you an idea of the area you are in. For example tree_a_14 is located in the Tree area, floor A (ground floor), shop #14. Players will often use this notation for communicating shop locations in chat if you are looking for something in particular.

Server Shops

There are four public service shops in the centre hub of the mall:

  • Simon's Shulkers Lost & Found: Contains traders for buying plugin tools and warp cards to the endfarm and pigfarm community farms. After purchasing the warp tokens, "use" the token to activate it before using the warp commands. The delicious present is yours to keep or consume!
  • Warm Gossip: Sells Rendog outfits, community banners, and a rotating selection of miniblocks and armour stands.
  • Amby's Booming Beats: Selling custom records for your listening pleasure!
  • Seasonal Build

Shops

From Guide:Shops

Player Shops on the Dogcraft Server are a way of buying and selling goods in exchange for Dogcraft Dollars (DCD). They take the form of chests in-game with the item being bought or sold appearing on top. This guide will walk through the process of setting up shops using the Shop plugin used by the server. The plugin also has a tutorial video that can be found here.

Using Shops

An example of the sign formatting for a shop. The shop is selling 5 of an item for 2 DCD.

To create a chest shop, players will need a chest and a sign. First, place the chest, and then the sign onto the chest or on the block in front of it. The vanilla sign writing interface will appear. Each of the four written line of the sign indicate a certain specification of the resulting shop. As previously mentioned, there are three types of shop that can be created, each has a slightly different creation process.

Sell Shops

A completed sell shop, selling cooked chicken.

Must be formatted as such;

  • Top Line: To indicate to the server that this will be a shop, the sign must contain the text [shop] on the top row.
  • Second Line: Type the numerical amount of an item you would like to sell for a certain amount of DCD.
  • Third Line: Type the numerical amount of DCD you would like in return for the entry placed on the second line.
  • Bottom Line: Type the text sell, to indicate a sell shop.

Once this is entered onto the sign, press enter. Afterwards, left-click (punch) the sign with the item you would like to sell. At this point, the text on the sign should turn from red to green, and the shop is activated. Remember to stock the shop with the items it is selling.

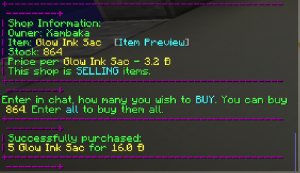
To purchase from a sell shop, go up to it and right-click the sign itself. There is no confirmation step, so be careful as you will be charged for your purchase. To see a preview of the shop's specifications, right-click the chest itself.

Buy Shops

A completed buy shop, buying 1 carrot-on-a-stick.

Must be formatted as such;

  • Top Line: To indicate to the server that this will be a shop, the sign must contain the text [shop] on the top row.
  • Second Line: Type the numerical amount of an item you would like to buy for a certain amount of DCD.
  • Third Line: Type the numerical amount of DCD you would like to spend for the entry placed on the second line.
  • Bottom Line: Type the text buy, to indicate a buy shop.

Once this is entered onto the sign, press 'Done'. You will exit the sign interface and the text will format and turn red. Afterwards, left-click (punch) the sign with the item you would like to buy. If you do not own the item you would like to buy, punch the chest without an item in your hand. Then, open your inventory using as usual, and you will enter the creative menu. Find and select the item you would like to buy and 'throw' it out of your inventory (an example is featured to the right). At this point, the text on the sign should turn from red to green, and the shop is activated.

Method of selecting an un-owned item. Drag the item out of the inventory and release the left-click button.

To sell to a buy shop, go up to it and right-click the sign itself. Ensure that you have the item the shop is buying in your inventory. The shop will take items from there in increments of the amount the shop buys. To see a preview of the shop's specifications, right-click the chest itself.


Barter Shops

A completed barter shop, swapping 1 dirt for 10 beacons.

Must be formatted as such;

  • Top Line: To indicate to the server that this will be a shop, the sign must contain the text [shop] on the top row.
  • Second Line: Type the numerical amount of an item you are willing to barter away.
  • Third Line: Type the numerical amount of a different item you are willing to barter for the entry placed on the second line.
  • Bottom Line: Type the text barter, to indicate a barter shop.

Once this is entered onto the sign, press 'Done'. You will exit the sign interface and the text will format and turn red. Afterwards, left-click (punch) the sign with the item you would like to barter away. Then, left-click (punch) the sign with the item you would like to barter for. If you do not own the item you would like to barter for, punch the chest without an item in your hand. Then, open your inventory using as usual, and you will enter the creative menu. Find and select the item you would like to buy and 'throw' it out of your inventory. At this point, the text on the sign should turn from red to green, and the shop is activated. Remember to stock the shop with the item it is bartering away.

To use a barter shop, go up to it and right-click the sign itself. Ensure that you have the item the shop is bartering for in your inventory. The shop will take items from there in increments of the amount the shop barters for and replace them with the item and amount it barters away. To see a preview of the shop's specifications, right-click the chest itself.

Shop Ownership and Tips

Once the shop has been finalised, you can toggle the item above the chest shop. Using your bare fist and right clicking will toggle between:

  • The item
  • The item in a frame
  • Nothing (shop item appears as text on shop sign instead)

Shops can be made using chests, trapped chests, barrels, or shulker boxes, and double chests can be used in order to double a shop's capacity. To limit the capacity of a shop (particularly for buy shops), put a 'filler' item in each slot that you want blocked. A chest with 26 slots of cobble, for example, will only buy carrots until it has one full stack of carrots. Any other items in the chest shop will not be sold, so you may also put shulkers of your shop item to make restocking the shop more expedient.

You can see extended information about your owned shop by shift-right-clicking the chest itself, similar to what customers do with a simple right click.

Other players will not be able to open or break someone's chest shop irrespective of the claim situation, and it is not possible to allow people to do so with commands. To remove your chest shop, crouch while breaking the sign attached to the chest. The chest will become a vanilla chest once again.