Guide
How to contribute to the Nether Transport Network
From Dogcraft Wiki
Skelleton123 (talk | contribs) No edit summary |
Colliecolie (talk | contribs) (added building references, will expand on it more later) Tag: Visual edit |
||
| (15 intermediate revisions by 5 users not shown) | |||
| Line 1: | Line 1: | ||
This guide for [[Nether Transport Network]] will show you how you can help dig tunnels, build them, and connect your base to the nether highways of the [[Survival 5|Survival 6]] servers of Dogcraft. | |||
| | |||
==Overview== | |||
[[File:NTN map.png|thumb|Sur6 NTN tunnel layout (all servers)]] | |||
On all survival servers, in all 4 directions, initial lines leave the main hub out to minihubs at 20,000 overworld blocks, and then another set of minihubs at 40,000 overworld blocks. Each set of minihubs has a "ring" line connected the 4 cardinal directions. | |||
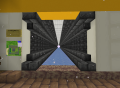
= | All tunnels are at Y=100. North, south, east and west tunnels are along "0" X and Z coordinates, and the main hub falls at 0,0. The "inner ring" tunnels are along 2500 nether blocks, and the "outer ring" tunnels are along 5000 nether blocks. | ||
== Digging NTN tunnels == | |||
WIP | |||
== | == Building NTN tunnels == | ||
<gallery> | |||
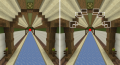
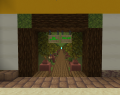
File:ForwardReferenceNTNSur6Pillar.png | |||
File:MainReferenceNTNSur6Pillar.png | |||
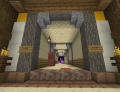
File:OpenTrapdoorNTNSur6Pillar.png|Underneath the trapdoor, there's a ''soul'' lantern for each pillar. If it's a banner pillar, there's a ''regular'' lantern. | |||
File:Reference2NTNSur6BannerPillar.png|Banner pillar without banners placed | |||
File:BannerReferenceNTNSur6.png|Make sure that the directional banners have the correct letter for what direction you're going. ie: facing east means E banner | |||
File:BannerReference2NTNSur6.png|facing west: W banner | |||
</gallery> | |||
==== | ==Connecting your base== | ||
===Player Stops=== | |||
Player stops can be built by anyone. These can be used to connect your base(s) to the NTN. In Survival6, tunnel design was made with connection creativity in mind! The tunnels have wide sections, with extra height. | |||
= | The first step to connecting your base to the NTN is to place your portal! Your portal base should be at targeted block Y=100. Then, look at your f3 screen and find which X or Z coordinate is closer to 0, 2500, or 5000 on any axis. Find which direction will bring you to your desired number, and dig in that direction to get to the main tunnel! Eventually, you will find yourself breaking through the bone block walls. | ||
Now, take a sign and label your entrance with your username or the name of your base if you have one. This helps other players find your tunnel, and comes in handy if you ever get lost! | |||
Congratulations, your portal is connected! Now, get creative! Design your tunnel however you want, and show off what you do best! | |||
* | |||
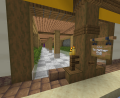
*Players must not remove the | Here are the guidelines for designing and building your connection to the NTN: | ||
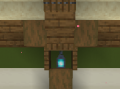
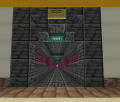
*Boat dispensers and collectors should be added to encourage players to keep boats off the track. | [[File:TunnelWallNTNSur6.png|thumb|Section of NTN between arches]] | ||
* | *Do not connect directly to a hub, go to one side and connect to a tunnel. | ||
* | *Entrances must be built between two "arches". If your tunnel happens to fall right on a pillar, contact an NTN Manager for advice on how to incorporate it into your tunnel design. | ||
< | *Don't build into the main tunnel farther than the bone blocks (i.e. you can replace the bone, but not go farther). | ||
*Players must not remove or change the slabs inside the main tunnel. This means you will need to get out of your boat to transfer to your tunnel<span> </span>:P | |||
*Boat dispensers and collectors should be added to encourage players to keep boats off the track and avoid angering piglins. In addition to this, please refrain from placing containers in your tunnel. | |||
< | *Player tunnel designs should be spawnproof to at least 30 blocks from the entrance. Of course, it is recommended that you spawnproof your entire tunnel! | ||
If we determine your | *Place a sign at the entrance with who/what is down the tunnel. An indication of which way the hub is located is also very helpful for travelers. | ||
*If the section of a tunnel you wish to build in is claimed, please contact the claim owner. | |||
=====Examples of connection designs:===== | |||
<gallery> | |||
File:NTNTunnelExample6Sur6.png|A labeled tunnel that is spawnproofed | |||
File:NTNTunnelExample5Sur6.png|A labeled and decorated tunnel | |||
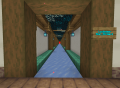
File:NTNTunnelExample7Sur6.png|A clearly labeled tunnel that is spawnproof, with ice to help players travel | |||
File:NTNTunnelExample2Sur6.png|A clearly labeled tunnel, that is spawnproofed with moss carpets. | |||
File:NTNTunnelExample3Sur6.png|A labeled tunnel with helpful directions, that is also spawnproofed and well decorated | |||
File:NTNTunnelExample4Sur6.png|An example on how to incorporate a pillar into a tunnel design | |||
File:NTNTunnelExample1Sur6.png|A labeled tunnel with map to show visitors the area, as well as ice for easy accessibility. | |||
</gallery>If we determine your connection isn't meeting the guidelines, an NTN Manager will contact you and help you improve it. We encourage any questions you would like to ask - please contact an [[Nether Transport Network|NTN Manager]] via Discord or in-game. | |||
===Main Stops=== | |||
Main stops are by approval only to avoid overcrowding in the tunnels and are listed on Hub boards. Please speak with a [[Nether Transport Network|Survival6 NTN Manager]] if you wish to make your connection a main stop. Examples of main stops would be large settlements, towns, community farms, and community builds/services. | |||
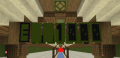
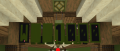
In 1.16+, any containers including chests, trapped chests, shulker boxes, barrels or enderchests will cause piglins to become hostile. For this reason, '''no containers will be placed throughout the NTN.''' To combat this, boat dispensers will be used at stops. As shown in the example below of a Main Station stop, a button is pressed to dispense a boat to the player. | |||
[[File:NTN_Boat_Dispensor_.png|532x532px]] | |||
<br /> | |||
Latest revision as of 22:13, 2 March 2024
This guide for Nether Transport Network will show you how you can help dig tunnels, build them, and connect your base to the nether highways of the Survival 6 servers of Dogcraft.
Overview

On all survival servers, in all 4 directions, initial lines leave the main hub out to minihubs at 20,000 overworld blocks, and then another set of minihubs at 40,000 overworld blocks. Each set of minihubs has a "ring" line connected the 4 cardinal directions.
All tunnels are at Y=100. North, south, east and west tunnels are along "0" X and Z coordinates, and the main hub falls at 0,0. The "inner ring" tunnels are along 2500 nether blocks, and the "outer ring" tunnels are along 5000 nether blocks.
Digging NTN tunnels
WIP
Building NTN tunnels
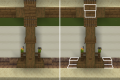
Underneath the trapdoor, there's a soul lantern for each pillar. If it's a banner pillar, there's a regular lantern.

Banner pillar without banners placed
Make sure that the directional banners have the correct letter for what direction you're going. ie: facing east means E banner
facing west: W banner


Connecting your base
Player Stops
Player stops can be built by anyone. These can be used to connect your base(s) to the NTN. In Survival6, tunnel design was made with connection creativity in mind! The tunnels have wide sections, with extra height.
The first step to connecting your base to the NTN is to place your portal! Your portal base should be at targeted block Y=100. Then, look at your f3 screen and find which X or Z coordinate is closer to 0, 2500, or 5000 on any axis. Find which direction will bring you to your desired number, and dig in that direction to get to the main tunnel! Eventually, you will find yourself breaking through the bone block walls.
Now, take a sign and label your entrance with your username or the name of your base if you have one. This helps other players find your tunnel, and comes in handy if you ever get lost!
Congratulations, your portal is connected! Now, get creative! Design your tunnel however you want, and show off what you do best!
Here are the guidelines for designing and building your connection to the NTN:

- Do not connect directly to a hub, go to one side and connect to a tunnel.
- Entrances must be built between two "arches". If your tunnel happens to fall right on a pillar, contact an NTN Manager for advice on how to incorporate it into your tunnel design.
- Don't build into the main tunnel farther than the bone blocks (i.e. you can replace the bone, but not go farther).
- Players must not remove or change the slabs inside the main tunnel. This means you will need to get out of your boat to transfer to your tunnel :P
- Boat dispensers and collectors should be added to encourage players to keep boats off the track and avoid angering piglins. In addition to this, please refrain from placing containers in your tunnel.
- Player tunnel designs should be spawnproof to at least 30 blocks from the entrance. Of course, it is recommended that you spawnproof your entire tunnel!
- Place a sign at the entrance with who/what is down the tunnel. An indication of which way the hub is located is also very helpful for travelers.
- If the section of a tunnel you wish to build in is claimed, please contact the claim owner.
Examples of connection designs:
A labeled tunnel that is spawnproofed
A labeled and decorated tunnel
A clearly labeled tunnel that is spawnproof, with ice to help players travel
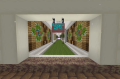
A clearly labeled tunnel, that is spawnproofed with moss carpets.
A labeled tunnel with helpful directions, that is also spawnproofed and well decorated
An example on how to incorporate a pillar into a tunnel design
A labeled tunnel with map to show visitors the area, as well as ice for easy accessibility.


If we determine your connection isn't meeting the guidelines, an NTN Manager will contact you and help you improve it. We encourage any questions you would like to ask - please contact an NTN Manager via Discord or in-game.
Main Stops
Main stops are by approval only to avoid overcrowding in the tunnels and are listed on Hub boards. Please speak with a Survival6 NTN Manager if you wish to make your connection a main stop. Examples of main stops would be large settlements, towns, community farms, and community builds/services.
In 1.16+, any containers including chests, trapped chests, shulker boxes, barrels or enderchests will cause piglins to become hostile. For this reason, no containers will be placed throughout the NTN. To combat this, boat dispensers will be used at stops. As shown in the example below of a Main Station stop, a button is pressed to dispense a boat to the player.

