Help
Wiki Editing
From Dogcraft Wiki
This is a guide to creating and editing a page on the Dogcraft Wiki!
This guide will teach you all the basics from creating and editing a page, to formatting, adding images and the basics of using the most common templates.
First, make sure you are logged in with your dogcraft account! You can only create and edit pages on the Dogcraft Wiki when you are logged in. To log in, you can click the "Login" button in the top right corner. If you are already logged in you will see you username and the head of your minecraft skin in the top right corner of the page.
Creating a page
The first step to writing about your great base or project is of course creating the page itself. To create a page you will first need to know the title. This can be pretty much anything as long as the title isnt already taken by another page. If for example your base has a specific name and you want to use that name for the page, but it is already taken, consider adding the season behind the name. For example "My Base (Survival 6)".
When you have settled on a page title, there are many different ways of creating a page, but the easiest is our Create an Article page. This page has many page templates to fit your needs. Simply scroll down to the type of page you want to create and enter the title for your new page in the text box, then click the "Create Page" button.
This will automatically create the page for you and add some basic elements to the page already and put you into the Visual Editor. A popup in the top right will inform you that you are looking at a page that is not saved on the wiki yet. Everything you see at this point only exists in your browser and the page will only exist for everyone else looking at the wiki after you saved it.
From here you can continue with Visual Editor: Basics below.
Editing an existing page
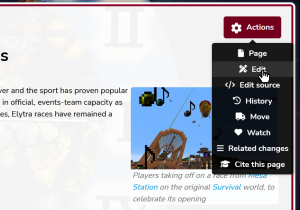
If you wish to edit an existing page, open the page you want to edit. When you are logged in, you will see a red "Actions" button in the top right corner of the page. Hovering over this button with your mouse will show you all the options available. To enter the Visual Editor, click the "Edit" option with the pencil icon. From here you can continue with Visual Editor: Basics below.
Visual Editor
Basics
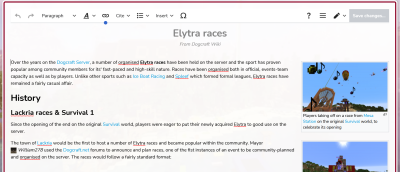
You are now in the editor. It looks like the page, but some bits may move around, and there's an edit toolbar at the top. This editor is called the VisualEditor, a WYSIWYG (what you see is what you get) editor. It behaves like any word processor (e.g. Microsoft Word). Feel free to click around and explore the parts of a page and what they look like when left-/right-clicked.
3. Editing the page
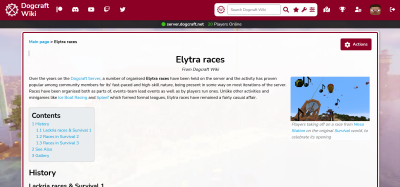
Now, I'm just going to edit the introduction. This bit is just plain text with no additional stuff; so to edit it, we just select where to type, and type there. You can select text to copy, paste, delete, etc. A new paragraph can be created by pressing enter.
Here's my finished reword. It may not be perfect, but it should be more readable and clear.
4. Saving the edit
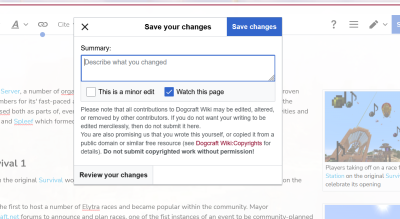
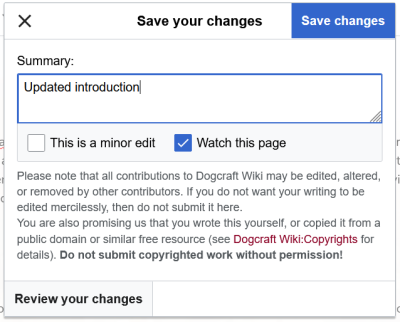
Saving an edit is done by clicking the 'Save changes' button on the right side of the toolbar. Click it to open the save dialog.
In the dialog there's a textbox to put an edit summary, and three buttons. First, we're going to check the 'Review your changes' button.
- Reviewing changes
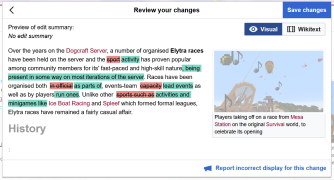
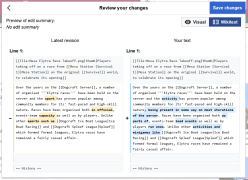
Changes are shown to you as a diff (which you may be familiar with if you use tools like git) either in Visual or Wikitext mode.
In visual mode, the text highlighted in red is the currently viewable page, and the text highlighted in green is as you've changed it. In wikitext mode the left column of text (with the green theme) is the currently viewable page, and the right column (with the blue theme) is the text as you've changed it. Lines with something that has changed have a thick left border, and lines with nothing changed are flat grey. Text that was added, changed, or removed is highlighted in green on the left, and the replacement (and new) text is highlighted in blue on the right. This text is in a markup language known as wikitext (covered in greater detail with later guides).
What we're looking for is twofold: double check our changes are what we want to do (proofread it), and see if anything has changed that should not have changed. The VisualEditor has persistent bugs that can cause it to insert/delete some extraneous text. If you notice this has happened to you, it may be possible to fix it by using source mode (see source mode introduction guide); however, you might have to start the edit over. Luckily, our example edit seems fine so we'll continue.
It is optional but recommended to do this for every edit.
- Saving
Clicking Return to save form brings us back to the previous form. Here we're going to add an edit summary and finally save the page.
An edit summary is a comment attached to your edit that isn't visible on the page itself, but is publicly viewable when looking at the changes that have been made. You should try to succinctly summarise your edit so that other editors can see what you've done. You can be as brief or descriptive as you like, but bear in mind there is a 255 characters limit. You can also use wikitext links in edit summaries, if you like. Edit summaries also get sent to the wiki Discord, along with who made them. Edit summaries can't be changed after the fact, only deleted by an administrator (and only within certain criteria).
I've gone with simply describing the edit as "rewritten introduction".
Now, we just click save. After a short time (don't close or reload the page during this; your edit may be lost if you do!), the edit is saved and the page automatically reloads to show the newest version of your page.
And that's it! The edit has been saved and is viewable to all.

